
Warning warning: very long post ahead! with tons of pictures that will hopefully help you make homemade ravioli! There's a video too. And also check out my contributing post on the KitchenAid blog — more ways to use your KitchenAid stand mixer!
I told you some months ago how obsessed I am with making homemade pasta and you had to know that would translate into making homemade ravioli!
It's really straightforward to make and I love making it. For this recipe, I made a spinach & ricotta filling and we have experimented with a chicken sausage and asiago cheese filling that Curtis loves…must share that with you soon!

I am glad to share that I have been moving through my list of five things I was scared to make and pasta being one of them! I honestly can tell you it's so easy. I use my KitchenAid 7 Quart Stand Mixer and the pasta attachment and it makes it so simple.
Hopefully my video will help you agree with me!

I used King Arthur Flour's semolina flour for this recipe. I love their perfect pastry flour for pasta too!

First, mix the ingredients in the stand mixer with the beater attachment. Once it's incorporated…

switch to the dough hook and mix until it turns into a ball like this. Sometimes, if your dough is too dry, you may need to add a little bit more water.

This is what the pasta dough looks like after coming out of the mixer. Knead it with your hands for a couple of minutes and then shape it into a ball.

And cover and allow to rest.

While the dough is resting, I work on the ravioli filling. This time I made a spinach and ricotta filling. I have made a chicken sausage and asiago filling that Curtis loves and keeps asking for. I need to make it for him again soon!
I used frozen spinach but I want to get ALL of the water out of so my filling isn't too wet. I put the defrosted spinach into a tea towel and twisted it and rung out the water.

Chop up the spinach as best as you can.

Mix the ricotta & parmesan cheeses, spinach and salt & pepper and cover and stick in the fridge until you're ready to use it.

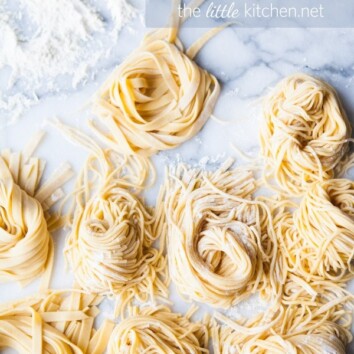
These two things: the KitchenAid® Pro Line® 7-Quart Stand Mixer and KitchenAid® Pasta Roller Set…make my life so easy. Seriously, you just run the dough through the pasta sheet roller a few times on different settings and then you have pasta!

I use my left hand to hold the sheet as it's coming out and my right to feed it through. Pasta life is easy.

One tip is to flour both sides of your pasta dough/sheet each time before running it back through the roller.

Aren't they pretty? I show you how to use the ravioli maker in the video!
Stick them on a parchment paper lined cookie sheet and freeze them for 15-20 minutes and then throw them into a zippered plastic bag and use them when you want to.

I love these breading trays my sister, Connie, got me for Christmas a few years ago. I use them so much. Beat two eggs in the left tray. Put breadcrumbs, etc. in the right one.
I use my left hand to dip them in the egg and then use same hand to throw in the right try and use my right hand to deal with the breadcrumbs. No more batter claw hands. 🙂

These are ready to fry.

These go into the oven!

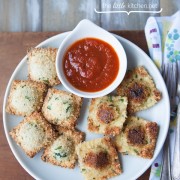
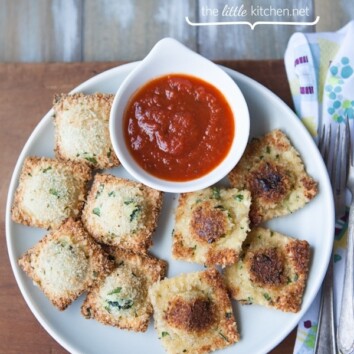
Baked or fried, baked or fried? I love them fried…in olive oil and butter. The baked ones are good too but I prefer fried anything. Serve them with your favorite tomato sauce and it's a great appetizer!
Of course, you can boil these raviolis and serve them for dinner too!
Supplies I used:
- White Marble Pastry Board
- KitchenAid® Pro Line® 7-Quart Stand Mixer
- KitchenAid® Pasta Roller Set
- Ravioli Maker With Press
- King Arthur semolina flour
- Wooden rolling pin similar to this (I can't seem to find the one I have online but I think a smaller one would be a lot easier to work with for this!)
- Small Baking Sheet (fits in my freezer nicely!)
- Parchment Paper
Homemade Spinach & Cheese Ravioli Recipe
Ingredients
Ravioli Pasta Dough
- 4 large eggs
- 4 Tablespoons water
- 1 3/4 cups all-purpose flour, plus more for preparing
- 1 3/4 cups semolina flour
- 1/2 teaspoon salt
Filling
- 1 cup of frozen spinach, defrosted, drained and chopped
- 3 cups ricotta cheese
- 1/4 cup parmesan cheese, grated
- salt & pepper
Baked or Fried Ravioli (this makes enough for about 18 to 20 raviolis for an appetizer)
- 2 large eggs, beaten
- 1 cup panko breadcrumbs
- 1/2 cup parmesan cheese, grated
- 2 Tablespoons chopped Italian parsley, or 1 teaspoon dried
- salt & pepper
Baked Ravioli
- non-stick cooking spray
Fried Ravioli
- 1/2 to 1 Tablespoon butter
- 1/2 to 1 Tablespoon olive oil
- Tomato Sauce for serving
Instructions
Ravioli Pasta Dough
- Adds eggs, water, flour and salt to the bowl of a stand mixer. Using the flat beater attachment, beat for 30 to 60 seconds on speed 2 and mix for 30 to 60 seconds. Add more water if the dough is too dry, in 1/2 Tablespoon increments.
- Remove flat beater and change with the dough hook. Knead for 2 minutes on speed 2. Remove the dough and knead by hand for 2 minutes on a marble pastry board. Allow the dough to rest covered for 20 to 30 minutes.
- Cut dough into four pieces before processing with pasta sheet attachment. Work with one piece at a time, be sure to cover the other pieces of dough. Take one piece and flatten into a rectangular shape. Add flour to both sides. Attach the pasta sheet roller to your stand mixer and set it to #1. Turn on the stand mixer to speed 2 and run the pasta dough through the pasta sheet roller. While on #1, fold the dough in half and run it through again. I do this several times. Add flour to both sides as needed during this process.
- Add a little bit of flour on each side of the dough/sheet between in pass through the pasta sheet roller, change setting to #2 and pass the pasta dough through the sheet roller twice. Change to #3 and pass the pass the pasta through twice and then the same for #4.
- After rolling the pasta out, I get my ravioli maker out and lay the pasta sheet on top of the filler (white plastic). Push the pasta sheet into the ravioli cavities and adjust the sheet as needed. Fill each ravioli with about a teaspoon, I use my fingers to ensure it gets all the way in there and there's no air pockets.
- After you're finished filling your pasta, add another pasta sheet on top and using your hands, you're going to push down to ensure the sheets are pressed together; you don't want any air pockets.
- Then cut the pasta sheet at the end with kitchen shears.
- Once again, press down with your hands and pat it a little, we want to make sure to seal the raviolis. Flip the ravioli filler and remove the filled pasta sheets. Then put the ravioli cutter on the ravioli sheets and line it up correctly. And then flip it over with the ravioli sheets. We're going to use this to cut the raviolis. Run a rolling pin over the top, back and forth. Gently pull apart the raviolis and you're done.
To make baked or fried ravioli appetizers, see below. When boiling your ravioli pasta, it only needs 5 to 7 minutes to boil, for frozen pasta just add a couple of minutes longer.
Baked or Fried Ravioli
- Put the beaten eggs into a shallow dish. Into another shallow dish, add breadcrumbs, parmesan cheese, parsley and salt and pepper and mix to combine.
- With one hand, dip one ravioli in the egg and place into the breadcrumb mixture. With your other hand, add breadcrumbs and shake off excess. Place on a plate and repeat.
Baked Ravioli
- Heat oven to 400 degrees F. Cover a baking sheet with foil and place a baking rack on top. Spray raviolis that have been covered in breadcrumbs with non-stick cooking spray.
- Place raviolis on top of baking rack on the cookie sheet. Bake for 15 minutes and then flip and bake for another 5 minutes or until both sides are golden brown and crispy. Serve immediately with your favorite tomato sauce for dipping.
Fried Ravioli
- Add butter and olive oil to a non-stick pan and heat on medium. Cook in batches, 2 to 3 minutes per side (4 to 5 minutes if frozen).
- Remove from pan and place on a paper towel lined plate. Optional: sprinkle with grated parmesan cheese.
Notes

Disclosure: I did receive flours from KAF for review. I also received the KitchenAid items referenced in this post for the purpose of review earlier this year but I was not asked to write this post. All opinions are always my own. There are affiliate links in this post!


jessica gonzalez says
Hi. So, maybe you’ve already come to this conclusion but this isn’t the way to use the ravioli cutter. A pasta sheet is placed atop the silver part then the plastic mold with the divots go on top to make an impression for the filling then removed. The filling is then placed in the divots and a pasta sheet goes on top of that to seal the filling. After, a rolling pin is used to press the pasta sheets over the silver part and begin to perforate. Cheers!
Kristina says
Do you have the nutritional Information for this recipe?
Elena says
The original Ravioli and pasta in general is Italian and is not make like that and above all is not baked or fried but simply cooked in boiled water and then you can put sauce or butter.
Mark says
Actually Elena .. how far back are we going. if your going true Italian than you must omit tomatos in the sauce too. Tomato’s aren’t Italian they come from the new world (America) .
Simon says
Never made my own pasta before. Great recipe. Thanks for sharing. Simon
Connie Herigstad says
Hey just for a fun change. You can do this same thing and fill it with any sweet filling ( Nutella, cannoli filling….etc, and then sprinkle powdered sugar over the top for a cute dessert treat.
Rachel says
It sounds good, very good.
Clauda says
Hi Julie,
I am wondering if you can use the pasta dough from the “home made pasta recipe”. that one does not have semolina, which is kind a difficult for me to get at the moment.
I appreciate your help.
Claudia
Julie Deily says
Hi Claudia, yes you can! 🙂
Marissa | Pinch and Swirl says
My mom used to panfry ravioli when I was little (I just looked up the plural and in Italian it’s raviolo 😉 ) – anywho, such nostalgia for me. But making them from scratch and then baking them until crisp – genius. I am SO making these. Thank you.
Diane says
I have made pasta with my KitchenAid but never ravioli’s. After watching this very clean and concise video I am inspired to make ravioli’s this weekend. Thanks for the great video.
Jessica @ A Kitchen Addiction says
Love ravioli! It’s about time that I make them myself!
judy says
Love it. new use for my kitchenaid!!!
Catey says
Hi! I used your recipe to make baked raviolis (but made them plain cheese) and have been asked to make them again. But they would like enough for leftovers. Have you ever made these and then kept them in the fridge after baking or frying them? Thanks.
Pam Good says
I have made all kinds of ravioli fillings ( squash, spinach, shallops, cheese) which I assembled, placed on waxed paper on a cookie sheet (single layer) frozen and then placed in a freezer bag for later use. After they are frozen, I use my food saver to vacuum seal them. Yum!
Nutmeg Nanny says
I just love your videos 🙂 these raviolis are SO perfect!!
Priti says
Hi there Julie!
Great blog and recipe. Loved your step by instructions and video. Can I substitute the eggs with something else for the pasta dough?
Thank you.
Priti
Julie Deily says
Hi Priti, I have only made pasta with eggs but I’m sure there are eggless pasta recipes that you can search around for. Thank you for the kind words!
Mercedes says
That video was great Julie! That ravioli maker look so handy!
Shannon Yeh says
OMG SO DELICOUS <3 I am so inspired by your blog =D
Rachel Cooks says
Putting this on my bucket list!
claire @ the realistic nutritionist says
Gotta say, you can’t beat homemade ravioli!!!
Suzanne says
Love fried ravioli! Beautiful tutorial.
Tasha @ ThatsSoYummy says
You make it look so easy… Yum!!!!
addie | culicurious says
Looks fantastic, Julie! I love making ravioli too but haven’t done it in so long. I really need to get a pasta machine again. that’s my main problem at this point 😉
Georgia @ The Comfort of Cooking says
Great job on these, Julie! My family and I make them every Christmas in what we call the “ravioli factory” and we just spend the whole day churning out hundreds. So fun though! Thanks for sharing.
Nami | Just One Cookbook says
What a great post, Julie! I’ll save this post until I buy all the equipments. I can’t wait to make it and I really really enjoyed the step by step video!! Thank you!
Kristen says
You are so brilliant, Julie. Thanks for sharing this great info! I need to get that pasta roller attachment. It’s on my someday wish list!
Kiersten @ Oh My Veggies says
I made homemade ravioli last year and they did not look nearly as perfect as yours! I’m so hungry now…
Barbara @ Barbara Bakes says
I need to pull out my pasta attachment and use it more. Great video.
Sommer @ ASpicyPerspective says
Great tutorial, Julie! Loved the video!
Kira says
wow, labor of love, i can tell it wasn’t an easy process but the end result is worth the effort. This makes me want a kitchen aid mixer even more, the possibility with that machine is endless.
Linda | The Urban Mrs says
Baked of fried – I’ll take them both. Ravioli is one of my favorites and it looks so simple to make. I hope I can make mine as pretty as yours.
bridget {bake at 350} says
These look so darn good, Julie!!!
Jessica @ A Kitchen Addiction says
Love the look of your fried ravioli! I really need to get a pasta roller!
Cindy@MijoRecipes says
Pinned it!
Stephanie@Henry Happened says
that looks amazing, Julie! you can totally see that is’s homemade!
Erin @ Dinners, Dishes and Desserts says
I love making homemade pasta. I have done ravioli a few times, but I don’t have the little tray to make them all so pretty! Great tutorial!
Maria says
Homemade is the best! Great post!
Lisa @ Oh Boy Oh Boy Oh Boy says
I’m not sure I’ll ever be that ambitious but they look soooo good, I totally pinned this just in case I get the urge to try something way outside my ability!
Bev @ Bev Cooks says
Diiiiiiiiig this, Julie!
Courtney says
Gorgeous! I’m hoping for the day M can finally have eggs – CANNOT wait to make little ravioli for her. Hubby would be thrilled to come home to this 🙂 I really need to invest in some attachments for my mixer. This is on my list !!
Robin Gagnon {Mom Foodie} says
These look fantastic.
I don’t have a Kitchenaid mixer. Many years ago when I bought the one I have, I didn’t think I’d use the attachments, so I bought something cheaper. It’s a classic example of you get what you pay for. I will upgrade to a Kitchenaid sooner or later.
I haven’t made fresh pasta in quite awhile, but was thinking about making some pirogi…really soon. For now, I have to drag out my old Italian pasta roller, when I want to make some.
shelly (cookies and cups) says
I am obsessed with this idea now! I need to get that attachment 🙂
Also, I can’t WAIT for the recipe for the sausage and asiago filling.. seriously?!
Anna @ Crunchy Creamy Sweet says
I love your homemade pasta recipes, Julie! These raviolis look absolutely perfect!
leslie says
Loved the video. Made it look so easy!
Chung-Ah | Damn Delicious says
Amazing! I really need to invest in a pasta roller now!
Gerry @ Foodness Gracious says
You’re inspiring me to make some more fresh pasta. So satisfying when you sit down to eat it, a true labor of love but then again love is a cool thing!
Jennay says
Can’t wait to try this recipe out!
Julianne @ Beyond Frosting says
I want to coem over for dinner!!!
Tieghan says
Making homemade ravioli is one of my favorite things to do in the fall and winter months! I love squash fillings!
I love, love, love you video and all you photos are great! Ww have the very same method of making ravioli. I even use the same mixer and attachment. Lol! Such an amazing post Julie!
Cassie | Bake Your Day says
Great post, Julie! Now I’m craving ravioli. I grew up making (and eating) them from scratch and I rarely do it anymore. These sound amazing!
Laura (Tutti Dolci) says
There’s nothing better than homemade pasta, gorgeous ravs!
Erin @ Texanerin Baking says
You can bake ravioli? And FRY it?! Oh my gosh. I’ve been missing out all these years. That’s not cool.
Thanks for bringing this to my attention. And I’m obsessed with pasta making too!
Nice video. 🙂
Joanne - Inspired Taste says
Just love this, Julie. Making pasta (especially ravioli) at home is the best 🙂
Kelly Senyei | Just a Taste says
Love, love, love this, Julie! You make it look so easy 🙂
Terri A. says
These look so good! I can’t wait to try them – great idea about freezing them and then using them when you want.
Que Delish says
Beautifully done! This makes me want to start making my own ravioli! I didn’t know you could bake (or frey) them from fresh … thanks for the inspiration!
Kathryn says
Oh wow, these ravioli look insanely good. I love homemade pasta and homemade ravioli in particular.
Katrina @ WVS says
This sounds like so much fun! Love this idea!